 Loathers.net
 Leprecondo: Overview
March 31, 2025 // IOTM Overview
Personally, I don’t think that condos are inherently very cool living spaces. I have personally always preferred the extra space and the extra trees inherent in having a house; condos always feel weird, like you’re renting with extra steps. I know they are technically quite a bit superior to apartments, but they’ve never felt like homes to me. One of my best buds lived in a condo for a few years and it legitimately felt like the developers had taken a bunch of perfectly good houses and just smushed them together. What’s up with that? I know that realistically you can fit a few more families in an area with condos, perhaps I have finally become the problematic non-urbanization guy Manendra always warned me about. Alas. All this is to say: I don’t like condos, personally… but if you gave me a choice between a condo and just living in a cheap-ass terrarium sharing my space with over 100 other familiars, I’d pick the condo. My Leprechaun, Jean Baptiste Colbert, agrees with me. So, let’s chat about the Leprecondo.
General Summary
The Leprecondo is a usable item in your inventory. Ostensibly, it is a tiny condo for your Leprechaun familiar, with configurable furniture in each of the condo’s four rooms. You can reconfigure the condo furniture three times a day, and these will carry over across rollover; due to this, your first configuration of an ascension is free, so you technically get 4 configs on D1 and 3 every day thereafter.
The general conceit of this item is that you, as your Leprechaun’s caretaker and the manager of his condo, are responsible for meeting your Leprechaun’s needs. There are six “needs” a leprechaun has — booze, food, sleep, stimulation, entertainment, and exercise. If your condo has furniture that serves the leprechaun’s need, you will get a bonus when the need hits, because your leprechaun has met their need with the furniture you selected. If you don’t have any furniture that meets the need, you get nothing. When you have multiple furniture that furnish a specific need, you will only get the bonus from the furniture that is closest to the end of the rotation, in an order of Top Left -> Top Right -> Bottom Left -> Bottom Right.
Your leprechaun’s active “need” will change every 5 turns, cycling through the six aforementioned needs in a cycle across your ascension. The order of needs among the six is random; it is constant within your ascension, but changes every time you ascend. (Note that you will always cycle through all six, so it changes timing in annoying ways but does not exclude you from any of the bonuses.)
As noted earlier, you get to choose what furniture your Leprechaun gets to use in the condo. Each of the 27 (!) pieces of furniture must be unlocked before they are usable, but once they are unlocked, they’ll exist on your account until human civilization draws its last breath.
In our view, the best way to think about the furniture is to sort furniture outcomes within each need and find the “best” furniture that fits each need, then construct your best furniture optimization from there. To wit, here are tables of the options you will get from furniture that furnishes each need. Items or buffs with major ascension relevance are bolded with a star emoji (⭐), and will be covered in the next section on speedrun applicability. In addition, most items fulfill a need in another category. To demarcate these multiple-need items, I’ll add an emoji for the furniture’s other use. These markers will be:
- 🍻 = Booze
- 🍏 = Food
- 📺 = Dumb Entertainment
- 💪 = Exercise
- 🧠 = Mental Stimulation
- 🌑 = Sleep
If the furnishing has a starred use in its other configuration, this will be marked with a sparkle (✨) emoji.
NEED #1: Booze 🍻
If you meet your leprechaun’s “booze” need with the following furniture items, here’s what you’ll get.
- ⭐ A fully-stocked wet bar furnishes a random awesome booze of size 1 or 2 from a small pool.
- A kegerator (🍏) furnishes a pint of Leprechaun Stout, a size 2 awesome booze.
- A programmable blender (🧠✨) furnishes a size-3 good booze.
- A ManCave™ sports bar set (📺✨) furnishes 1 good shot of schnapps, rotgut, or jell-o.
- A whiskeybed (🌑) furnishes a decent/good whiskey drink of varying size.
- A beer pong table (💪) furnishes 2 crappy/decent beers, or a beer bomb.
- A beer cooler furnishes 1 crappy/decent beer, or a beer bomb.
NEED #2: Food 🍏
If you meet your leprechaun’s “food” need with the following furniture items, here’s what you’ll get.
- ⭐ An Omnipot furnishes a random awesome quality food of size 1 or 2 from a small pool.
- ⭐ A fruit-smashing robot (📺) furnishes 2 random fruits… including limes!
- A sous vide laboratory (🧠✨) furnishes a random good food, largely stir fries and hams of size 2-3.
- A cupcake treadmill (💪✨) furnishes a standard-issue cupcake, a size 1 good food.
- A fine upholstered dining set (🌑) furnishes a random good food of size 3 or 4.
- Both the kegerator (🍻) and hot plate furnish a random decent food from a bunch of bad options.
NEED #3: Dumb Entertainment 📺
If you meet your leprechaun’s “dumb entertainment” need with the following furniture items, here’s what you’ll get.
- ⭐ Both the “UltraDance karaoke machine (💪✨)” and the “couch and flatscreen” (🌑) give you 10 turns of a buff for +5 familiar weight and +5 familiar experience per combat.
- ⭐ An ultimate retro game console furnishes phosphor traces, a 3-toxicity spleen item that gives you one charge of a copy effect.
- ⭐ The ManCave™ sports bar set (🍻) furnishes a bar dart, which is a combat item that damages your foe and increases booze drops by 200%.
- Both the “boxes of old comic books” and the “internet-connected laptop” (🧠✨) give you 10 turns of a +1 moxie stats per combat, +20% mox buff.
- A fruit-smashing robot (🍏✨) gives you 10 turns of +20 flat moxie, alongside 10 DR. (Also, it fulfills a booze need!)
NEED #4: Exercise 💪
If you meet your leprechaun’s “exercise” need with the following furniture items, here’s what you’ll get.
- ⭐ A cupcake treadmill (🍏) gives you 10 turns of a buff for +5 familiar weight and +5 familiar experience per combat.
- ⭐ A high-end home workout system furnishes a scoop of pre-workout powder, a 3-toxicity spleen item that gives you one charge of a freerun banish skill.
- ⭐ An UltraDance Karaoke Machine (📺✨) gives you 10 turns of a +15% item drop buff.
- A beer pong table (🍻) furnishes a combat item that delevels monsters by 25%.
- Both the “buckets of concrete” and the “padded weight bench” (🌑✨) give 10 turns of +1 muscle stats per combat, +20% muscle.
- A gigantic chess set (🧠) gives 10 turns of +20 flat muscle, alongside +50% HP.
NEED #5: Mental Stimulation 🧠
If you meet your leprechaun’s “mental stimulation” need with the following furniture items, here’s what you’ll get.
- ⭐ Both the “programmable blender” (🍻) and the “sous vide laboratory” (🍏) give 10 turns of a +30% meat buff.
- ⭐ The internet-connected laptop (📺) furnishes one set of crafting plans, a usable item that gives you 1 turn of free crafting.
- The complete classics library furnishes one leprechaun antidepressant pill, a 3-toxicity spleen item that gives 40 turns of a buff for +10% combat rate, along with +50% weapon/spell/ranged damage.
- A sensory deprivation tank (🌑) gives 10 turns of +20 flat mysticality, alongside +50% MP.
- Both a “thrift store oil painting” and a “gigantic chess set” (💪) give a buff for +1 mysticality stats per combat, +20% mysticality.
NEED #6: Sleep 🌑
If you meet your leprechaun’s “sleep” need with the following furniture items, here’s what you’ll get.
- ⭐ The four-poster bed gives 20 turns of +100% combat initiative, alongside +10% to all stats.
- ⭐ A padded weight bench (💪) gives 10 turns of -5% combat rate.
- A whiskeybed (🍻) gives 10 turns of +50% combat initiative, +2 hot res, and +10 cold damage.
- A sensory deprivation tank (🧠) gives 10 turns of +50% combat initiative, along with 5-10 MP regen.
- Both a “free mattress” and a “couch and flatscreen” (📺✨) give 10 turns of +25% combat initiative.
- A fine upholstered dining set (🍏) gives 20 turns of +5-10 MP and HP regen.
Speedrun Applicability
Yeesh. That was a lot. Having been exposed to all the furniture, you probably can see why this is a bit of a weird one — there’s a MASSIVE amount of decision space for how you use it. That said, there are only a handful of things inside the condo that will actively save you turns. Let’s get to them, in a rough order of value.
Leprecondo: Spleen Items
There are three useful spleeners; the phosphor traces (📺), the pre-workout powder (💪), and the leprechaun antidepressants (🧠). If we’re honest with ourselves, the antidepressants really don’t help you much; 40 adventures of +50% damage and +10% combat may be useful in some very niche scenarios, but it isn’t ever going to be saving you more than 1 turn. So the only two we really need to think about are the chain-to-fight copy (phosphor) and the free-run banish (powder).
In the current meta, we have quite a lot of copiers. We have 15 habitat copies, 11 mimic egg summon/copies, and 3 VHS tape copies per day. We also have 3 pocket wishes, which can be copies or summons, and about 5 purple candle copies per day. Even if you assume you aren’t using any mimic eggs or pocket wishes on strict copies, that’s still 23 copies a day. Which makes you think “well, maybe this isn’t worth it.”
To that I’d say: maybe! But maybe not. The nice thing about phosphor is that these are copies that can burn delay. So, for instance, if you are using your habitats to push free Halloween monsters into zones for delayburn, you can use a phosphor (and a purple candle!) to get 2-3 turns of delay burned for the price of one. In some cases, this may actually be superior to using a freerun banish, as you still get some value out of the fight.
Or, well. Maybe not. There are always going to be a lot of things you get from free fights that you don’t get from free runs. But in modern standard, there are fewer than normal. Usually, free fights don’t advance familiar skills — however, we currently have the Peace Turkey and the Patriotic Eagle, two familiars who can do their useful work on free runs. Often, you’d prefer the free fight for the leveling stats. Not so in modern standard, where leveling is done via cold resistance and prayers. There is also some inherent value to a banish; the copy only duplicates what you’re already getting from the original monster, whereas a banish can sometimes save you actual turns from repeated encounters with a terrible monster you hate to see while also perhaps burning delay.
TLDR? If you are finding yourself constantly running out of copies, somehow, you may want the phosphor. But most people are going to pick the pre-workout powder.
Leprecondo: Lots and Lots of Buffs
The spleen items are cool, and that’s where most of the Leprecondo’s turns saved are going to come from; being able to fill your 15 spleen with 5 useful pills a day and translate that into 5 turns saved is pretty dope. But there’s a bit of power localized in the buffs, as well.
The most powerful buff, and the buff that deserves the most of your time, is the +5 familiar weight / +5 familiar experience buff. It’s granted by three separate pieces of furniture (one 💪, two 📺), which is nice — there are multiple ways you can queue it up. Because there are 6 needs that cycle 5 turns apiece, if you want to have this buff on the maximum amount of time, you can maximize by having both your exercise/entertainment needs serviced by those furniture pieces, giving you 20 turns of the buff every 30 turns. This isn’t “always-on”, but it’s close. The one major sticking point here is that both exercise/entertainment are where you get your spleen items from, which means that you will almost certainly need to do some shuffling around. Still, if you have the Chest Mimic (or are playing the Z for Zootomist challenge path), you are absolutely going to want this up; this kind of huge chunk of familiar experience will cut dozens upon dozens of turns needed to generate 1100 XP per day, which is anywhere from 2-3 turns in value given a whole lot of extra Peace Turkey turns (with extra weight, too!).
The remaining buffs of note are less centralizing, but still useful. Let’s list them out, in order of value (and with their associated need at the forefront…):
- 🌑 I’ve talked to death about the benefits of combat rate decreases in prior posts; for more on this, check the Peace Turkey post. I note in there that +1% NC is worth about 2 turns if it can be applied to every NC search in the run. This 10 turn buff is a good bit less valuable than that; the amount of stupid nonsense you’d need to do to ensure this is always active for NC hunts and never active other times sucks. There’s probably a ceiling of about a turn saved off this buff.
- 🌑 There are a ton of initiative sources in this IOTM. You can get +100% from the four-poster, 50% from whiskeybed, 50% from the sensory deprivation tank, and 25% from the mattress or the flatscreen. Realistically, we are so initiative-rich that these are unlikely to be significantly turnsaving, but there’s so much of it that I’d bet this will save 1 turn or so in some future meta where we find ourselves a bit more lacking in the initiative realm. Even now, the 100% from the four-poster is pretty good, and probably will be a mainstay of your selections.
- 🧠 There are two sources that give 10 turns of the +30% meat buff. Realistically, you don’t want this on -all- run, but it probably will save you about 0.20 of a turn on nuns and (maybe?) help a lower shiny account 1-turn the Wall of Meat.
- 💪 The +15% item drops buff from the UltraDance Karaoke Machine is small, but it’s useful in a few key spots in your run. Unfortunately, this overlaps with the pre-workout powder, so you likely will not get the buff until you have snagged all of your pills. This might save you a fractional turn. Maybe. Like, I dunno, a tenth of a turn? This one is basically the La Croix of turnsavings. Maybe you can only taste the savings if you’re a sommelier yourself. I dunno, dude.
Leprecondo: Droppable Items (and Turngen!)
Beyond the aforementioned spleen items, there are two particularly useful droppables that bear mention for turnsaving reasons.
- 🧠 The crafting plans (from the internet-connected laptop) are one of those items that will be very powerful to certain shiny/perm configurations and useless to others. By definition, having a free craft will save a turn you spend crafting something if you don’t otherwise have free crafts. However, we do already have several craft sources in standard — in particular, we have 3 free cooks, cocktailcrafts, and general crafts from last Crimbo’s three permable skills. This balances against the things you may want to craft. Every run will need one free cook for your unstable fulminate. Most runs will want a muculent machete for the Hidden City; if you take a friendly Degrassi Knoll moonsign, this will be free; otherwise, it will take three free crafts. A rare portion of runs will also want a tuxedo shirt, as it represents 14-21 extra turns generated if you are close to a daycount barrier (or desperately trying to achieve a 1-day run). This takes 1 free craft. Ergo, there’s a pretty enormous difference in value for the crafting plans. In standard, they don’t really save you anything — you have enough free crafts to handle everything, -especially- if you go to a Degrassi Knoll sign. In an avatar path like Z for Zootomist, you will want anywhere from 1 (Degrassi sign) to 5 (non-Degrassi sign, need turngen).
- 📺 You should really get at least one handful of bar darts, from the ManCave™ sports bar set. It’s an entertainment need, so it overlaps with both the familiar experience buff and the phosphor pill. Which sucks. But spading indicates it represents +200% added booze drop for the combat where you use it. That’s a lot, man! It’s worth about a quarter of a turn in expectation on getting the bomb piece from the possessed wine rack in the spookyraven basement, and (atop your normal item drop + the toy Cupid’s bow) is essentially a yellow ray for a blackberry bush if you can’t get the item drop to cap your blackberries that early in your run.
Then, the turngen. By god, the turngen. This is the kind of IOTM that could, in theory, fill all your organs. Will it fill them well? … sort of? The Omnipot and the fully-stocked wet bar both produce items that can be consumed for anywhere from 4 to 4.5 adventures per drunk/fullness. This is pretty decent.
But there is currently a big accumulation of lower-turnsave-investment items that fill these needs just as well, or even better. For instance, Mayam owners always get 3 yams a day, for three yam martinis at 4-6 adventures apiece — which rises to 5-9 with a tuxedo shirt. You even get 6 yams one of your days! Normally, we take one of the S.I.T. courses that allows you to stock up on shots of wasp venom, which is 5 adv/drunkenness, better than anything from the Leprecondo, and you get about 10 of them per day. You usually take astral pilsners for 6 shots of 11 adv/drunk drinks.
Food is a bit more barren, but not -that- much more barren. Spaghetti Breakfast gets you one 6 adv/full food a day for your first food. Peace Turkey owners will get about 5-6 pieces of cake per day, perhaps more, which are 4.5 adv/full. Leafy browns are 5 adv/fullness, and 3 fullness apiece (albeit a heavy cost leaf-wise; you likely only get 1/day, and only if you’re trying). Shadow Bread is 4.3 adv/fullness, hilariously. Mini Kiwi digitized cookies are 5 adv/fullness, though I doubt you want to spend enough turns with the mini kiwi to get more than 1 of them. You can use clovers in Cobb’s Knob to burn delay and get 5.5 adv per drunk/fullness booze and food as well.
Herein lies the rub — at least for this year in standard, you probably don’t need to look at the Leprecondo as a particularly focal turngen item. It’s entirely possible this changes 2026 and 2027; many of the listed tools are going to rotate out, and this is admittedly a -lot- of base level turngen. But it’s also not tremendously better than the basic stuff you can generate in-run; heck, key lime pies are all 3.8 adv/fullness, and you can easily eat and repeat with your keys once you have a few limes. Essentially, the Leprecondo is going to be a small but decent improvement over just eating stuff you find on the ground. But if you really need turngen, you’ll want a bit more than the Leprecondo gives you, and (at least for now) better options at lower cost exist.
Also: if you need fruit prior to doing the orchard side quest during the Frat War, for things like Sauceror potions or custom drinks, you can use the fruit-smashing robot for some random fruit. Neat!
Leprecondo: Finally, some SYNTHESIS!
OK. So. We’ve listed out all the furnishings, gone over the useful bits of furniture, and now sit at the ”… so, what does it all mean?” portion of our weekly program. When decking out your Leprecondo, you’ll want to build your configurations from the bottom up in the condo — as noted earlier, furniture priority goes bottom right, bottom left, top right, top left. This means the most important furniture for your purposes should be on the bottom, while the tertiary stuff should be on top. For in-run use, I highly recommend installing Tissen’s LepCon relay script, as it will help ensure you know what needs you’ll get fulfilled in the current configuration. With the analysis above, you should be able to figure out the right configurations based on your relevant needs.
However, I really don’t want to leave you with just the analysis — here are some templates that will be roughly the stuff you want in your run.
TEMPLATE #1: Banishes, Crafting, Buffs
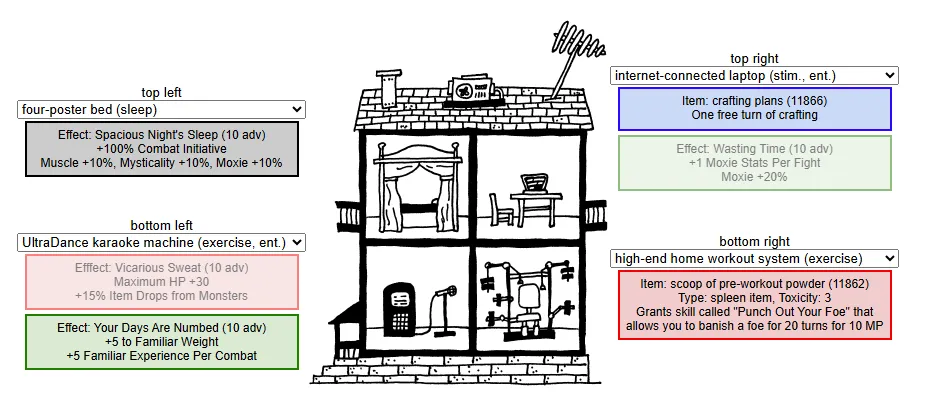
- Top Left: four-poster bed 🌑
- Top Right: internet-connected laptop 🧠 + inactive 📺
- Bottom Left: UltraDance karaoke machine 📺 + inactive 💪
- Bottom Right: high-end home workout system 💪
BENEFITS BY NEED:
- 💪 Pre-workout powder; you’ll get your 5 freerun-banishes day in < 150 combats of this config
- 📺 You’ll get the +5 fam weight/fam XP effect 1/3 of your turns
- 🧠 You’ll get 4-5 crafting plans in the time it takes to get your powder
- 🌑 You’ll get the +100% init effect 2/3 of your turns
TEMPLATE #2: Copies, Crafting, Buffs
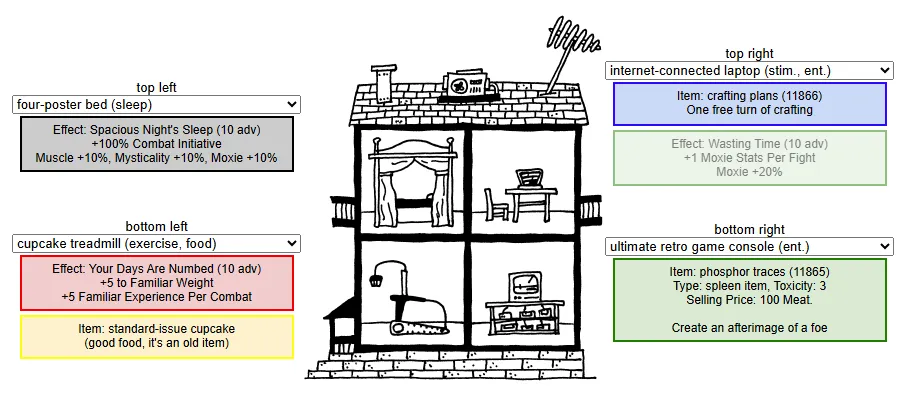
- Top Left: four-poster bed 🌑
- Top Right: internet-connected laptop 🧠 + inactive 📺
- Bottom Left: cupcake treadmill 💪 + 🍏
- Bottom Right: ultimate retro game console 📺
BENEFITS BY NEED:
- 📺 Phosphor traces; you’ll get your 5 chained copies in < 150 combats of this config
- 💪 You’ll get the +5 fam weight/fam XP effect 1/3 of your turns
- 🧠 You’ll get 4-5 crafting plans in the time it takes to get your traces
- 🌑 You’ll get the +100% init effect 2/3 of your turns
- 🍏 You’ll get some cupcakes you won’t eat!
TEMPLATE #3: Buffs, Buffs, and more Buffs
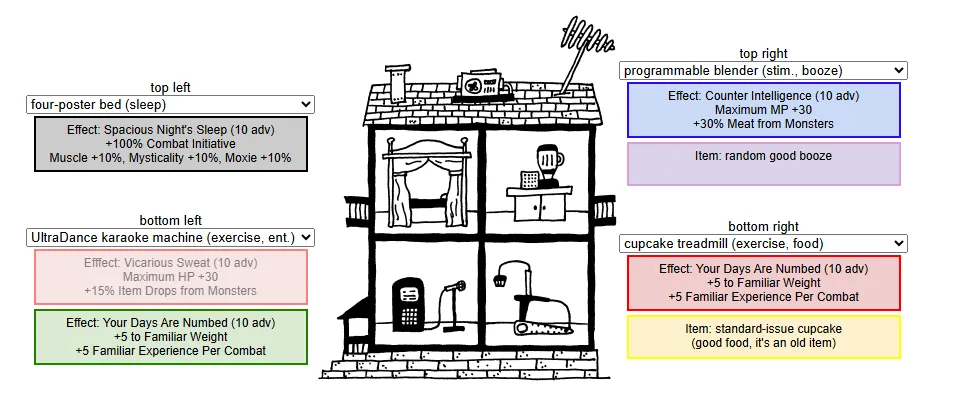
- Top Left: four-poster bed 🌑
- Top Right: programmable blender 🧠 + 🍻
- Bottom Left: UltraDance karaoke machine 📺 + inactive 💪
- Bottom Right: cupcake treadmill 💪 + 🍏
BENEFITS BY NEED
- 📺/💪 You’ll get the +5 fam weight/fam XP effect 2/3 of your turns
- 🧠 You’ll get the +30% meat effect 1/3 of your turns
- 🌑 You’ll get the +100% init effect 2/3 of your turns
- 🍏 You’ll get some cupcakes you won’t eat!
- 🍻 You’ll get some size-3 booze you won’t drink!
TEMPLATE #4: Let’s go have a dart with the degens
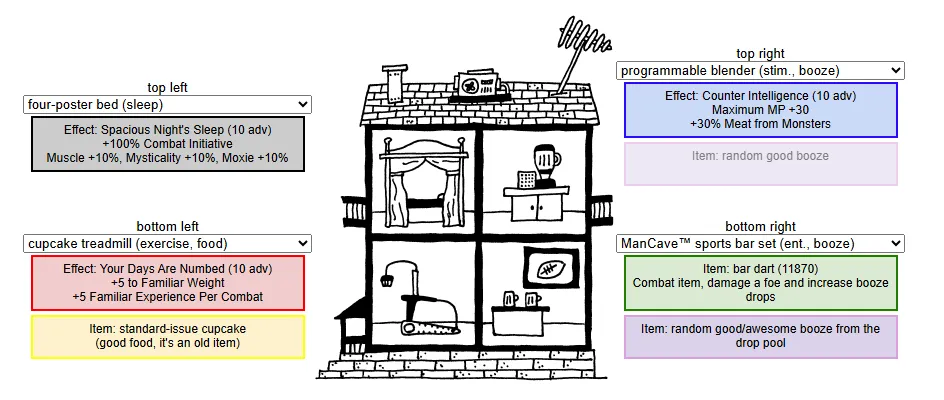
- Top Left: four-poster bed 🌑
- Top Right: programmable blender 🧠 + inactive 🍻
- Bottom Left: cupcake treadmill 💪 + 🍏
- Bottom Right: ManCave™ sports bar set 📺 + 🍻
BENEFITS BY NEED
- 📺 You’ll get a bar dart every 30 turns
- 💪 You’ll get the +5 fam weight/fam XP effect 1/3 of your turns
- 🧠 You’ll get the +30% meat effect 1/3 of your turns
- 🌑 You’ll get the +100% init effect 2/3 of your turns
- 🍏 You’ll get some cupcakes you won’t eat!
- 🍻 You’ll get some shots and schnapps you won’t drink!
2025 In-Standard Synergies
- Obviously, there’s major synergy with the Chest Mimic (2024). We’ve already mentioned it, but it bears repeating.
- The chained copy from phosphor traces synergizes pretty well with the Recall Habitats skill from the Book of Facts (2025); burn a bit of delay with some nice wanderers!
- The freerun/banishes from the pre-workout powder synergize nicely with your Peace Turkey (2024) and your Patriotic Eagle (2023); 5/day extra freerun turns corresponds to a bit less than half of one eagle phylum banish and 20% of a freerun from the Turkey.
Overall Rating
We rate the Leprecondo a tier 2 IOTM. In modern standard, you’ll save a flat 5 turns per day from the spleen items. The familiar XP buff is worth 2-3 turns per run in freed up familiar flex (the fewer other familiar XP sources you get, the more this is worth!), bar darts are probably worth a turn per run, and crafting plans are worth anywhere from 0-3 turns depending on the path and your crafting needs. There’s perhaps a fraction of a turn or two from all the initiative buffs, as well. This nets out to an IOTM that saves you 6-7 or so turns per day in modern standard — a good bit more in avatar paths (especially Zootomist, where it’s excellent) where more crafting is needed and fewer perms deal with it, while saving a full 5 turns less in unrestricted (where you never get the spleeners due to significantly better spleen options). On net: fun item, cool concept, lots of neat mechanics. Good work, TPTB. Now… please, release a few simpler IOTMs. My family is begging you. 🙏